If you have any questions about items to order, run into any difficulties, or wish to purchase or inquire about items that are not yet on the site, kindly contact me directly at "[email protected]"
Please note that it is difficult to automatically calculate accurate shipping for very small and light items, like parts, etched steps, etc. But feel free to place your order regardless, with the assurance that I will refund any and all freight over charges upon shipping. You will pay actual shipping plus a small handling charge to cover shipping supplies in all cases.
Shipping update: I will ship via USPS Priority Mail only, as UPS and FedEx are not interested in dealing with small shippers. Please note that while USPS has been generally very reliable and the tracking is excellent, if they damage a shipment, even to the point of crushing the box, they WILL NOT pay a claim in my experience. All shipping is therefore done on a best effort basis. While we will work with you to resolve any damaged shipments, be advised that insurance from USPS is unlikely to work, period. We are very experienced in proper packaging and always do our best to insure the product arrives safely.
For both International AND Domestic orders, if shipping amount seems high, be assured that I will credit any shipping over-charges at time of order shipment.
| |||||||||||||||||||
|
|

Faaaaaading Freight Cars {January 2001 RMC}
By Mike Rose
I don't know about you, but as a prototype modeler, one of the things I try to do is recreate what I see trackside. This includes, among other things, producing the effect of fading paint on rolling stock. There are a number of methods of achieving this look, and we'll examine a few of them for their various merits and provide examples of what they look like. Often one has to use a variety of methods to achieve a certain look (see my article on ex- C&C PS5344 Athearn Boxcars, December 2000 RMC). Our first example is a Walthers 86' DT&I boxcar. When I got this car in it was in the as-delivered scheme of shocking pink/purple, so vivid it literally hurt my eyes to look at! The car was nicely detailed, but totally useless to me in that eye grabbing paint job. This car might possibly have set a record for "fastest-weathered" car that I ever did after acquiring it! I don't have a "before" photo of this car for comparison, but any of you who have seen the car know what I'm talking about! I just couldn't stand it long enough to photograph it in the un-weathered state. On the other hand, it hit me as a really nice car with a lot of potential.
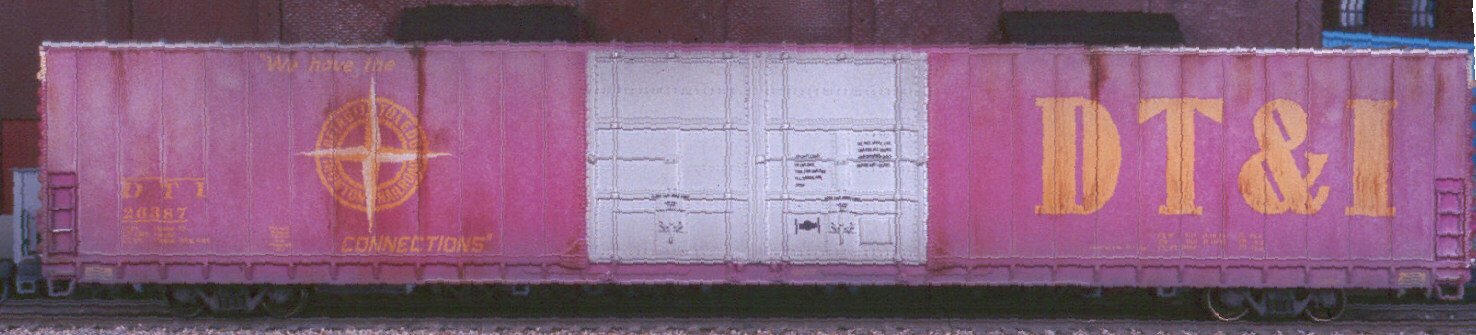
The first thing I did was Dullcote the car, very thoroughly. This took any sheen off the car, protects the paint, and serves as the basis for most of my weathering jobs. Next, I used a trick that I learned quite by accident. You see, I had been doing some scenery work on my layout, and I had a line of Conrail hoppers that I had painted and lettered sitting on the siding at Brockway Mine, which is very near where I was scenic-ing. After doing some ground cover, I took a pump sprayer and hit the whole area with ordinary isopropyl rubbing alcohol, of the $.79 per bottle variety. This provides a wetting agent for the diluted glue spray or matte medium to follow, and prevents the ground cover (or ballast) from blowing away from the spray or balling up. (By the way, use only in a well ventilated area, use a fan if necessary!) Once I was done, I discovered to my horror that my line of carefully done boxcar red hoppers had all blushed to a whitish look! Examining each car in anguish at the work that had been ruined, I decided to gamble, and re-Dull-Coted one of the cars. To my intense relief the blush vanished, like nothing had happened! This turned into the only fully reversible weathering technique that I know of.
After taking the DullCoted 86' boxcar, letting it thoroughly dry for at least 24 hours (and doing two coats, very good coverage is required for this to work properly), I then took my handy pump sprayer and did the entire car liberally, a very wet wash on the entire car including the roof. Magically, as the alcohol evaporated (a spray booth is an ideal location for doing this, by the way), the car faded to the shade seen in the photos, and even the roof looked like oxidized zinc (galvanize), perfect for adding some rust. I used my standard oil colors to add rust effects to the car, and there it was, much improved! At least to me it looked like every other DT&I car I'd ever seen painted like that. I used an airbrush to add grime to the lower parts of the body, especially around the draft gear boxes and underframe that should never show electric purple, plus did my usual dirty rust treatments to truck sideframes, wheels, and couplers. The result is pictured. It went from being hard to look at to one of my favorite and most commented-on cars. And it was easy!
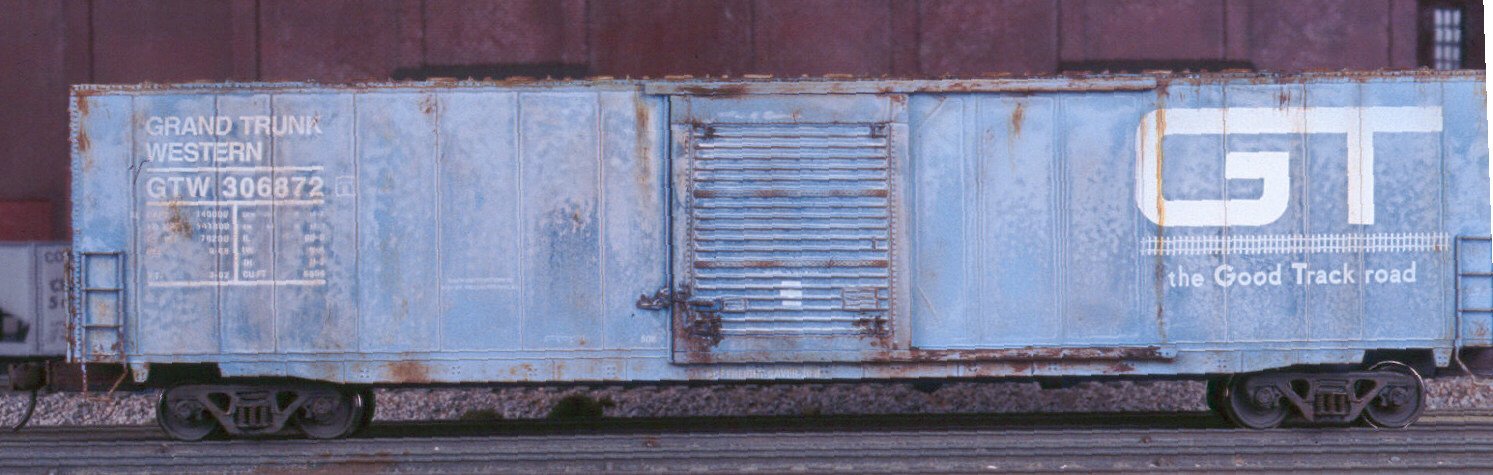
My favorite car is the GT boxcar from Atlas. This 60' auto parts car is a really nice model, needing only a minimum of detailing to bring it up to a high standard of realism. Pictured is a similar car from Walthers, and trust me, the Atlas car really was this same color when I started! I again used the two-coat DullCote method, with one day of drying, then the same liberal application of alcohol spray to fade the car. However, the results were disappointing this time, with a bit of a blotchy effect as a result. Although I was tempted to DullCote it again and forget the fade, I didn't, and the car sat for some time. I finally decided to try a fine overspray of lighter blue paint on the car, in fact, the same spray I used on the aforementioned ex-C&C PS5344 boxcar. By using a very fine, light spray, I was able to control how much of the paint went on and where. Basically all I did was even out the blotchiness. The result was just what I was looking for. I added my standard rusted wheelsets, truck sideframes and couplers, plus fabricated a coupler cut lever from wire and a DW Sy-2202 eyebolt, plus created a trainline air hose with a brass Cal-Scale airhose and a couple of Athearn handrail stanchions to hold it in place, and you can see the result. The Atlas stirrups were nice enough for me to not replace, though if they ever break, I'll probably use the A-Line stirrups. Some rust on the roof (see my upcoming article on Roofs & Ends) and I had another unique car for my roster. The picture of the two cars coupled end to end says it all in terms of before and after!
Other methods of fading cars include just using the lighter paint overspray, and also using chalks. Some cars are so faded that they need to be created by starting with an Undecorated model and custom-mixing the paint to match the faded prototype. However, I'd encourage you to try the DullCote/alcohol method and see if you like it. And if you don't, just re- spray and no harm done! (By the way, if you are doing a locomotive or caboose that has any clear glass in it, be sure to either remove it or mask it off prior to these experiments. Incidently, this is also useful for creating frosted glass for factory and other structures.)